> ## Documentation Index
> Fetch the complete documentation index at: https://docs.img-processing.com/llms.txt
> Use this file to discover all available pages before exploring further.

# Quickstart

> Your first interaction with the IMG Processing API

## Getting an API Key

IMG Processing API is organized around REST principles. The API has predictable resource-oriented URLs, accepts JSON-encoded request bodies (except for file uploads), returns JSON-encoded responses, and uses standard HTTP response codes and methods.

Now let's see how to getting start with IMG Processing. The first step is creating an account.

<Card title="Create an account" icon="plus" href="https://dashboard.img-processing.com" horizontal>
  Image Processing API. A picture is worth a thousand words. Integrate powerful image processing capabilities into your applications in minutes.
</Card>

As soon as you sign up for the IMG Processing API, you will receive a test API key that you can use to make requests to the API. This key is for testing purposes only, since it has a limited rate limit, adds a watermark to the processed images, and images wonÃƒÂ¢Ã¢â€šÂ¬Ã¢â€žÂ¢t be stored for more than 90 days.

Test images DO NOT count towards your monthly quota, so you can use them to test the API without worrying about your usage, you donÃƒÂ¢Ã¢â€šÂ¬Ã¢â€žÂ¢t even need a credit card to start processing images!

<img src="https://mintcdn.com/imgprocessing/96najFJQ0rXKRJFY/images/test-api-key.png?fit=max&auto=format&n=96najFJQ0rXKRJFY&q=85&s=fbe077ee384263a3a5449fcf3118c82d" alt="API Key" class="rounded-lg" width="2238" height="440" data-path="images/test-api-key.png" />

## Making a Request

Once you get the api key, you can authenticate request to the API, just include your API key in the x-api-key header of your request. Here is an example of how to do this using curl:

```bash theme={null}
curl -X GET https://api.img-processing.com/v1/images \
-H "x-api-key: YOUR_API_KEY"
-H "Content-Type: application/json"
```

If you prefer it, you can also fork the Postman Library and do the request from there:

<div className={'flex flex-row justify-center'}>
  [  <img style={{
        borderRadius: '0.5rem',
    }} src="https://mintcdn.com/imgprocessing/96najFJQ0rXKRJFY/images/button.webp?fit=max&auto=format&n=96najFJQ0rXKRJFY&q=85&s=5e779eb3e846ca766816d1384b387676" alt="Hero Dark" className={'w-[128px] h-[32px] self-center'} width="128" height="32" data-path="images/button.webp" />](https://app.getpostman.com/run-collection/6263667-a1fd2c1b-fe7b-4a05-87c1-6e0172caa20c?action=collection%2Ffork\&source=rip_markdown\&collection-url=entityId%3D6263667-a1fd2c1b-fe7b-4a05-87c1-6e0172caa20c%26entityType%3Dcollection%26workspaceId%3D845670a4-96fc-43cb-8204-4cff32ab67f2#?env%5BAPI%5D=W3sia2V5IjoiaG9zdCIsInZhbHVlIjoiaHR0cHM6Ly9hcGkuaW1nLXByb2Nlc3NpbmcuY29tIiwiZW5hYmxlZCI6dHJ1ZSwidHlwZSI6ImRlZmF1bHQiLCJzZXNzaW9uVmFsdWUiOiJodHRwczovL2Rldi1hcGkuaW1nLXByb2Nlc3NpbmcuY29tIiwic2Vzc2lvbkluZGV4IjowfSx7ImtleSI6ImFwaWtleSIsInZhbHVlIjoiIiwiZW5hYmxlZCI6dHJ1ZSwidHlwZSI6InNlY3JldCIsInNlc3Npb25WYWx1ZSI6ImxpdmVfYWo0ZXVvZjV5OTJ0YzRweGxwZjg5bDlwdWhxYXlla2IiLCJzZXNzaW9uSW5kZXgiOjF9LHsia2V5IjoiaW1hZ2VfaWQiLCJ2YWx1ZSI6IiIsImVuYWJsZWQiOnRydWUsInR5cGUiOiJhbnkiLCJzZXNzaW9uVmFsdWUiOiJpbWFnZV9qbGp0eXdmMGlodmJxcnRkMHYyNGEzd20iLCJzZXNzaW9uSW5kZXgiOjJ9XQ==)

</div>

Or you can use the playground in the documentation. For example, let's create an image from a prompt using the documentation playground!

<Card title="Imagine an Image" icon="plus" href="/api-reference/endpoints/creation/imagine" horizontal>
  Create an image using AI
</Card>

## Creating an Image

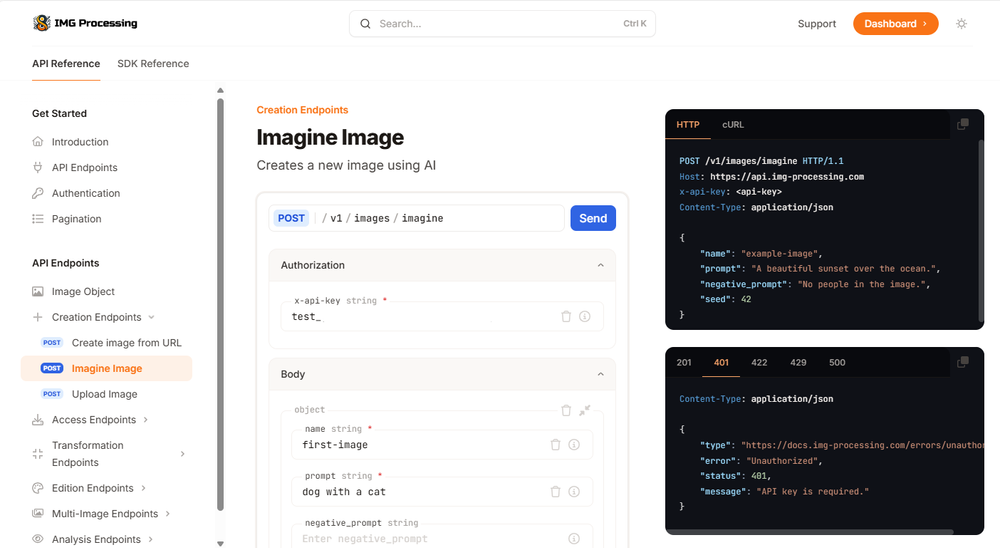
All the images in IMG Processing, must be created. To create an image you can upload one from your computer, by an url from an allowed origin, or create one from a prompt. Let's create an image from a prompt using the playground.

First copy your api key on the dashboard and paste it on the playground expanding the authorization accordion and setting the `x-api-key` field. Then open the body accordion and set a custom name and prompt.

<img src="https://mintcdn.com/imgprocessing/96najFJQ0rXKRJFY/images/examples/imagine.png?fit=max&auto=format&n=96najFJQ0rXKRJFY&q=85&s=1414ba4862e773eeae8491b0dcc7fa85" alt="API Key" class="rounded-lg" width="1000" height="548" data-path="images/examples/imagine.png" />

After doing it, just run send! This will return an image object in the response.
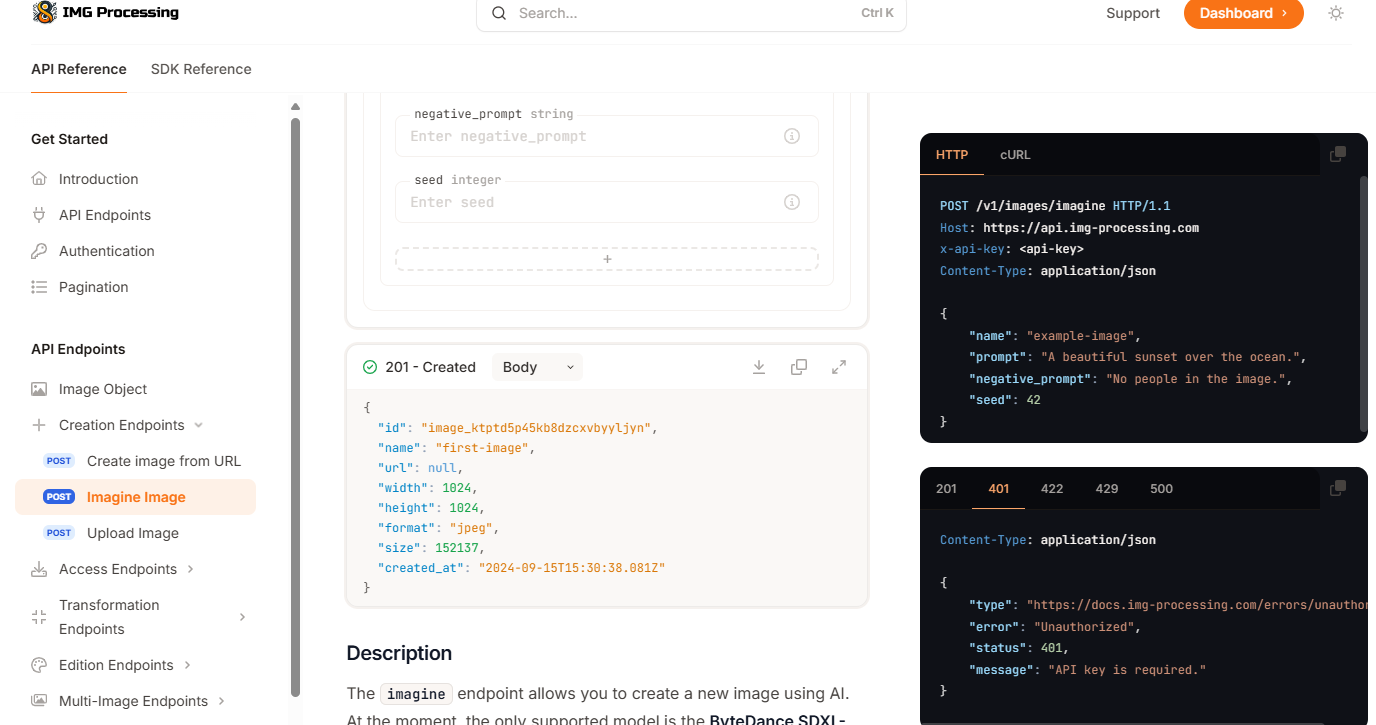
<img src="https://mintcdn.com/imgprocessing/96najFJQ0rXKRJFY/images/examples/imagine-2.png?fit=max&auto=format&n=96najFJQ0rXKRJFY&q=85&s=358fff090834141db26426248f29c191" alt="API Key" class="rounded-lg" width="1376" height="725" data-path="images/examples/imagine-2.png" />

<ResponseField name="id" type="image_{string}">
  The unique identifier of the image. This identifier is used to reference the image in subsequent requests.
</ResponseField>

<ResponseField name="name" type="string">
  The name of the image. This name is provided when uploading the image and is the way
  the image is identified in your account. It is not unique, in fact, each transformation you make
  to an image will create a new image with the same name.
</ResponseField>

<ResponseField name="url" type="url | null">
  The public URL of the image. By default, this URL is not available and will be `null`.
  You can make the image public by using the [publish](/api-reference/endpoints/access/publish) endpoint.
  Once the image is public, the URL will be updated with the public URL.
</ResponseField>

<ResponseField name="width" type="integer">
  The width of the image in pixels.
</ResponseField>

<ResponseField name="height" type="integer">
  The height of the image in pixels.
</ResponseField>

<ResponseField name="format" type="jpeg | png | webp">
  The format of the image. The format can be one of the following: `jpeg`, `png`, `webp`.
  <Info>We are constantly adding new formats to the API, so make sure to check the latest documentation for the most up-to-date list of supported formats.</Info>
</ResponseField>

<ResponseField name="size" type="integer">
  The estimated size of the image in bytes. The size is an estimate and may not be exact since images can be compressed or optimized depending
  on the format and quality settings used during processing.
</ResponseField>

<ResponseField name="created_at" type="datetime">
  The date and time when the image was created. The date and time are in ISO 8601 format.
</ResponseField>

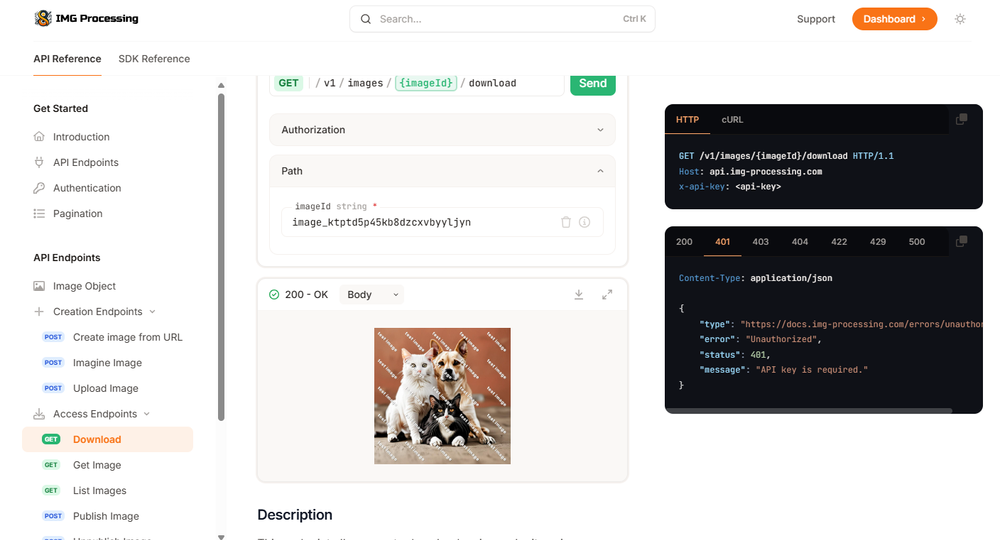
## Downloading the Image

Do you want to check how it was uploaded? Just download the image going to the download endpoint and put the ID of the image to download!

<Card title="Download Image" icon="download" href="/api-reference/endpoints/access/download" horizontal>
  Download an image from the API
</Card>

<img src="https://mintcdn.com/imgprocessing/96najFJQ0rXKRJFY/images/examples/download.png?fit=max&auto=format&n=96najFJQ0rXKRJFY&q=85&s=cea36266c33f6af82ffb6501e3efac15" alt="API Key" class="rounded-lg" width="1000" height="540" data-path="images/examples/download.png" />

Here is everything you need to start. If you want to make more complex tasks, don't hesitate to checkout the documentation.